Featured answer: what actually matters for night photos
If you want better night shots fast, prioritize three things: a stable tripod, an intervalometer (or a solid in-camera timer), and a lens that lets in enough light. A cheap lens or a shaky tripod will cost you more quality than people think.
In my own late-night shoots, the biggest “wow” moments came from fixing the boring parts: wind-proofing the tripod, using bulb/long exposures correctly, and choosing lenses based on real specs like maximum aperture and field of view. Those choices affect stars, noise, and how many keepers you get.
Night photography gadgets checklist (quick reality check)
Night photography is less about “cool gadgets” and more about controlling three problems: camera shake, exposure timing, and light gathering. If you fix those, the rest gets easier.
Here’s what matters most for most people shooting at night with a full-frame or APS-C camera.
- Tripod stability: reduces blur during long exposures (especially at 20–60 seconds).
- Intervalometer: helps you run multi-shot sequences for star trails, time-lapse, or consistent frames.
- Lens choice: affects sharp stars, coma (star smears), and how fast you can get the right exposure.
- Power + memory: long sessions drain batteries fast and fill cards faster than you expect.
Most people buy one “star” lens and ignore the tripod and timing gear. That’s why they end up with soft images and inconsistent results.
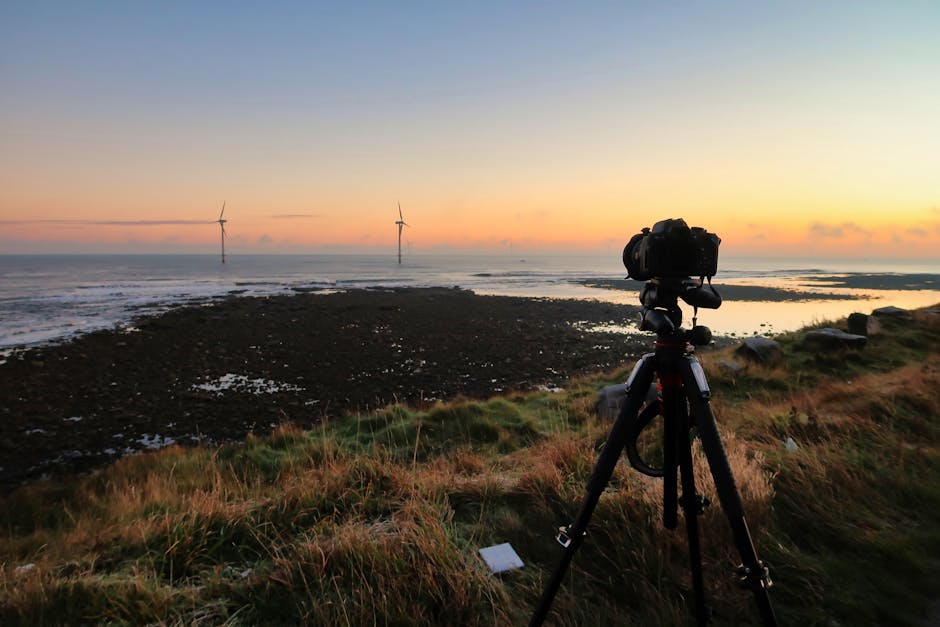
Tripods that survive real night conditions
A tripod for night photography is judged by one thing: can it stay still while the shutter is open. At night you often shoot at 10–30 seconds, and the smallest shake shows up.
When I test tripods for night work, I look past the brand name and focus on how it behaves in wind, on uneven ground, and when you extend the legs. A great tripod on a showroom floor is not the same as one on gravel with a breeze.
What specs to watch for in a night photography tripod
Tripod specs are confusing, so I use a few simple rules. “Maximum load” is helpful, but “how rigid it feels” matters more.
- Leg diameter and center column: thicker legs usually mean better stiffness. Avoid using the center column extended for night shots.
- Head type: ball heads are fast, pan-tilt heads are often more precise. Either works if it stays locked tight.
- Feet and footing: rubber feet are fine on grass; spikes help on soft dirt. Some tripods include both.
- Height and stability: shooting higher makes shake worse. If you can get close to eye level by spreading legs wider, do that.
Wind proofing: the simplest trick that saves sharpness
Wind is the silent enemy of night tripod setups. I’ve had star photos fail because I assumed a calm forecast meant “no breeze.”
Here’s the fix I use almost every time: hang weight from the tripod hook (if it has one). A small stuff bag or a zip pouch with rocks adds stability fast.
- Set the tripod, spread the legs wide, and keep the center column down.
- Attach a small bag to the hook.
- Use a remote release or the intervalometer so your hand never bumps the camera.
In 2026, this still beats most “pro” upgrades because it targets the exact shake source.
How to set up your tripod in 10 minutes (step-by-step)
You don’t need to be a tripod expert. You just need to repeat a good setup so you can focus on composing and exposing.
- Pick stable ground: avoid loose sand. If you must shoot on gravel, pack it down gently with your foot.
- Extend legs first: extend all three legs evenly, then fine-tune height with small changes.
- Lock everything: tighten the leg locks firmly. Half-tight is still movement.
- Level the head: not just for aesthetics—level horizons help when you stack images later.
- Mount camera and lens: keep it centered. If your setup tilts, the tripod becomes less stable.
- Do a quick shake check: touch the tripod lightly and watch if it bounces.
Intervalometers: timing gear that turns “okay” into consistent
An intervalometer is a tool that controls when your camera takes each photo. For night work, it’s how you avoid touching the camera and how you run sequences without guessing.
This is the one gadget I recommend even to people who don’t plan to shoot star trails. Multi-shot runs help reduce noise and make your results repeatable.
Intervalometer vs built-in camera timer (what most people miss)
Many cameras have built-in interval modes, but they’re not always as flexible as a real intervalometer. In real field use, flexibility matters when you’re trying to match settings across a long session.
Here’s where a dedicated intervalometer tends to win:
- Long runs: it can keep shooting for hundreds of frames without you babysitting it.
- Exact interval control: you can set the delay between shots so you don’t miss time or waste gaps.
- Bulb/exposure modes: some models handle bulb or long exposure sequences more smoothly.
- Reduced risk: fewer menu trips means fewer settings mistakes mid-shoot.
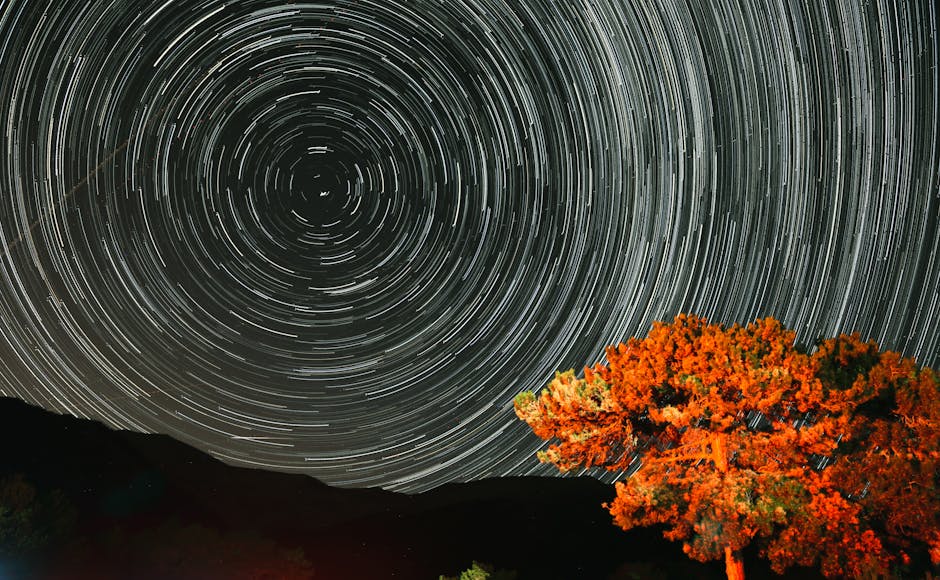
Star trails with an intervalometer: a practical starting recipe
Star trails are one of the easiest wins because you’re stacking many short exposures. You’re basically turning the night sky into a long “paint stroke.”
Here’s a simple setup I’ve used for years with good results:
- Mode: Manual, with your lens at wide open or near wide open.
- Exposure: 20–30 seconds per frame (use shutter speed that avoids blown-out highlights).
- Interval: set it to near 1 second gap or “minimal” so trails look continuous.
- ISO: start around ISO 400–800 on full-frame; ISO 800–1600 on APS-C (adjust based on sky brightness).
- Frames: aim for 150–300 frames for a visible arc effect.
That gives you roughly 1–3 hours of trail time depending on shutter speed and gaps. If you want faster results, shorten the session—but expect shorter arcs.
Time-lapse at night: one setting mistake that ruins the whole sequence
The most common time-lapse mistake I see is changing exposure or focus settings halfway through the sequence. Auto modes love to “correct” your scene as the camera learns what it sees, and that creates flicker.
Use manual exposure and lock focus. If your camera supports it, turn off auto ISO and auto white balance during the sequence. Keep white balance fixed so the sky color stays stable frame to frame.
Lenses that actually matter: fast, sharp, and controlled
A lens is your light bucket. For night photography, “fast” usually means a wider maximum aperture like f/1.8, f/2, f/2.8, or f/4 depending on your style.
But aperture isn’t the only spec. Star shapes and contrast matter too—especially if you plan to shoot city lights, Milky Way, or deep sky scenes.
Minimum lens requirements for night sky photography
If you want stars to look like points instead of blobs, start with these lens traits.
- Wide aperture: f/2.8 or faster helps keep ISO lower and shutter speed usable.
- Good corner performance: many lenses get soft away from the center. Look for low coma or good star quality.
- Manual focus markings: focus repeatability is a big deal when you return later.
- Acceptable distortion: distortion isn’t always bad, but it affects framing if you’re doing landscapes.
On my own night shoots, I’ve found that a slightly slower lens with better star rendering often looks better in the final image than a very fast lens that smears points in the corners.
Wide-angle vs standard vs telephoto at night (with real use cases)
Your focal length changes everything: how much sky you see, how forgiving the focus is, and how fast you reach “enough light.”
| Focal length | Best for | Big challenge |
|---|---|---|
| 14–24mm (full-frame) | Milky Way landscapes, star fields, big sky scenes | Corner sharpness and coma |
| 24–35mm | Vast scenes with less distortion | Finding focus fast |
| 50–85mm | Portraits under stars, tighter compositions | Longer exposure + higher sensitivity to shake |
| 100–300mm+ | Moon, constellations, compression landscapes | Tripod rigidity and tracking needs |
If you’re starting out, wide-angle is usually the easiest. Telephoto nights are gorgeous, but they demand better technique and often more gear.
What I look for in “star lenses” (an honest take)
People talk about “astrophotography lenses” like they’re all magic. They’re not. I treat them like regular lenses with fewer compromises.
My personal checklist:
- Edge-to-edge sharpness: stars should stay point-like. If corners smear at wide open, stop down one stop if you can.
- Low coma: coma is the “corner star tail” look. It’s not just aesthetic; it wrecks star trails and Milky Way texture.
- Coatings and flare control: near street lights, flare can wash out the sky.
If your lens is only sharp in the middle, your best images may come from centering the brightest part of the scene.
People Also Ask: night photography gadgets
What tripod height is best for night photography?
The best height is the one that lets you keep the camera steady without extending the center column. In plain terms: set the tripod lower, spread the legs wider, and bend your stance as needed.
For most people, that means shooting somewhere near chest or eye level with legs spread rather than fully extended. If you can’t avoid height, use shorter exposures and hold the camera setup carefully.
Do I need an intervalometer for star trails?
You don’t technically need one, because you can use built-in interval modes on many cameras. But an intervalometer makes long star trail sessions less stressful and more repeatable.
If you’re doing anything longer than about 30–60 minutes, the reliability of a dedicated interval setup matters. You’ll spend less time in menus and more time watching your composition.
What lens is best for shooting the Milky Way at night?
For most beginners, a wide-angle lens around 14–24mm (full-frame) with a fast aperture is the easiest path. It captures more sky, and it gives you more room to frame the Milky Way before you go too deep into settings.
If you want cleaner stars, prioritize corner sharpness over only chasing the fastest aperture number.
Should I use a wide-open aperture at night?
Sometimes. Wide open can be great when you’re dealing with very dark skies or you need faster exposure. But many lenses get slightly better star shape when you stop down one stop (for example from f/1.8 to f/2.8, depending on the lens).
Test it on a real night with your own camera. A tiny change can reduce coma and improve contrast, which looks like a “free upgrade.”
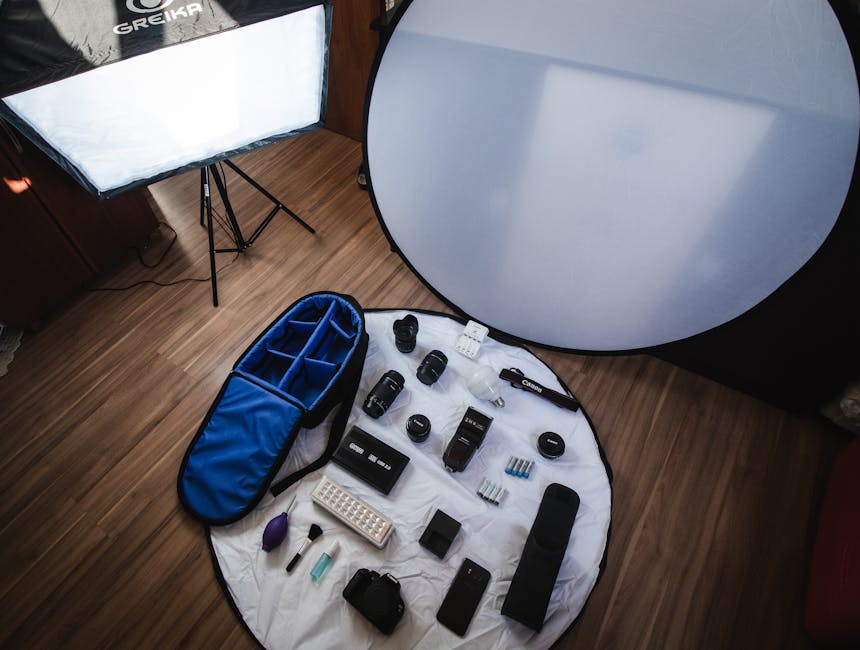
Extra gadgets that support tripods, intervalometers, and lenses
Tripods, intervalometers, and lenses do the heavy lifting. Still, a few small extras help night sessions run smoother and safer.
Remote release, headlamp, and spare batteries
A remote release keeps you from touching the camera during the exposure. A headlamp with red light mode helps you see without ruining your night vision.
Batteries drop faster at cold night temps. I plan for at least one spare battery per 2–3 hours outdoors, more if it’s below freezing.
Lens hood and gaffer tape: the boring tools that fix real problems
Street lights and headlamps create flare. A lens hood helps, but sometimes you still get stray light hitting the front element.
That’s where gaffer tape comes in. I use it to block tiny light leaks around the lens and camera body when I’m in bright mixed lighting.
Noise control gadgets: what matters in 2026
Noise happens when you gather light at high ISO or long exposures. Many people fix it by lowering ISO, but that sometimes means longer shutter speeds which can increase hot pixels and sensor noise too.
In 2026, a smart approach is to shoot consistent exposures, then use image stacking if your method allows. If your blog has readers interested in practical workflow, this ties nicely into your gear review and tutorial cluster.
For related tech and safety topics, you can also check your site’s cybersecurity coverage—night shoots often mean you’re away from home and you’ll likely review files on the go.
Common mistakes (and how to avoid them)
Night photography fails in predictable ways. Most of them come from setup habits, not bad luck.
Mistake 1: using the center column during long exposures
Extending the center column often makes the tripod less rigid. Even if it feels locked, it can flex slightly when the shutter fires or when wind hits.
Fix: extend the legs instead, keep the center column low, and do a quick shake check before you start the interval run.
Mistake 2: leaving autofocus on during a sequence
Autofocus can hunt when it changes contrast from frame to frame. That can shift focus and turn a clean sky into soft streaks.
Fix: focus once, switch to manual focus, and confirm by zooming in on a bright star or distant light.
Mistake 3: assuming “minimum ISO” is always best
Low ISO reduces noise, but it also means you need longer shutter speeds to expose the sky. Longer exposures can bring more hot pixels and more sensor heating.
Fix: choose a shutter speed you can control, then adjust ISO to get a good histogram without blowing highlights in the foreground.
My setup for a typical night shoot (what I pack and why)
I keep my night kit pretty tight. Too many gadgets slows me down, and at night that means you miss good moments when the sky clears.
Here’s a setup that works for Milky Way landscapes, star trail sessions, and city skyline nights with a bright foreground.
- Tripod: compact but stiff, legs spread wide; no extended center column.
- Intervalometer: for star trails and consistent multi-shot runs.
- Wide-angle lens: fast aperture with good corner sharpness.
- Remote release: if the intervalometer isn’t the only trigger.
- Spare battery: at least one extra.
- Headlamp: red mode to protect night vision.
- Lens hood + tape: for flare control around street lights.
If I’m doing astrophotography more seriously, I also bring a small way to warm up batteries in a pocket and a cloth for dew. Dew can show up quickly even when the weather feels cool but not freezing.
Internal links (related posts you’ll probably like)
If you’re building night skills and want more hands-on help, these posts on our site connect well with the gear choices above:
- Best tripods for night photography
- How to use an intervalometer for star trails
- Milky Way focusing techniques that actually work
- How to protect camera files on the go
Night sessions are long, and data management matters too. If you’re shooting all night, you’ll want a safe plan for backups and card handling.
Conclusion: buy for stability, timing, and light—not hype
Top Night Photography Gadgets aren’t about collecting random tools. They’re about three practical things that directly change image quality: a stable tripod, an intervalometer (or reliable interval mode), and a lens with the light gathering and corner sharpness you need.
My actionable takeaway for your next night shoot is simple: set up the tripod low with legs spread wide, lock focus and exposure, then run a timed sequence instead of pushing buttons by hand. If you do that consistently, you’ll get sharper stars and fewer “why is this blurry?” surprises—even with gear that’s not the newest.
Featured image alt text suggestion: Top Night Photography Gadgets setup with tripod, intervalometer, and wide-angle lens for Milky Way stars.