Sensor size is the fastest way to predict what your camera will do in the dark—especially noise and usable depth of field. The surprising part is that two cameras with the same “megapixels” and similar lens choices can look totally different at ISO 6400, not because one is “better,” but because the photosites physically collect light differently.
Sensor size impacts low-light performance through how much light each pixel can capture (before processing), which then affects noise, highlight roll-off, and how forgiving your exposure is. It also changes depth of field once you match framing and output size—so “more bokeh” isn’t just a lens thing.
As of 2026, the mainstream expectation is clear: if you want consistently clean images at night, or you need a specific subject separation at the same composition, you must think about sensor size alongside focal length, aperture, and shutter speed. That’s the real lever—not marketing ISO numbers.
What “sensor size” actually changes (and what it doesn’t)
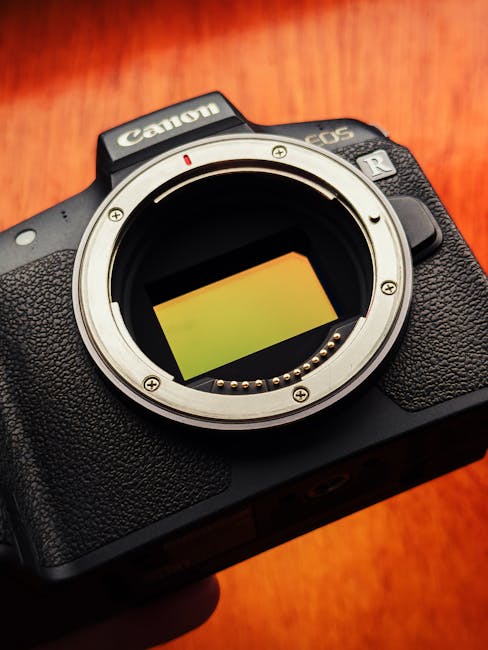
Sensor size refers to the physical dimensions of the imaging sensor, commonly expressed in formats like full-frame (36×24mm), APS-C (about 23.6×15.6mm), Micro Four Thirds (17.3×13mm), and 1-inch (13.2×8.8mm).
Here’s the definition that helps: Sensor area is the surface where light is converted into electrons using a photosite array. Bigger sensors can support larger photosites (or more pixels with different tradeoffs), which typically improves signal-to-noise at equal framing and exposure assumptions.
What people get wrong is assuming sensor size alone decides image quality. If you compare two cameras at different focal lengths, different apertures, different framing, or different total light gathered, you can easily attribute results to sensor size that were actually caused by lens transmission, stabilization, or autofocus behavior.
The “equal framing” rule I use in the field
When I evaluate low-light cameras, I match the subject framing first, then match exposure goals, and only then compare noise. That means adjusting focal length and aperture to keep the composition consistent across formats.
For example, if I’m shooting a street portrait at the same head-and-shoulders framing, I’ll use equivalent focal length choices: ~50mm on full-frame, ~35mm on APS-C (1.5× crop), ~35mm on Micro Four Thirds (2× crop for ~70mm full-frame equivalent). Then I aim for the same exposure outcome and shutter speed strategy.
This approach produces results that actually match what photographers see when they print or share at the same output size.
Low-light performance: sensor size, electrons, and noise
Low-light performance is fundamentally about how many photons you collect and how noisy the electronics become when you amplify the signal.
In plain terms, the sensor converts incoming light into electrons. At low light, the number of electrons is small, and noise sources like shot noise (inherent randomness) and read noise (electronics) become more noticeable after amplification.
Because bigger sensors often allow larger photosites or better noise management at similar pixel counts, they tend to deliver cleaner shadows and smoother gradients—especially when you underexpose and lift shadows in post.
Dynamic range and “shadow recovery” are where sensor size shows up
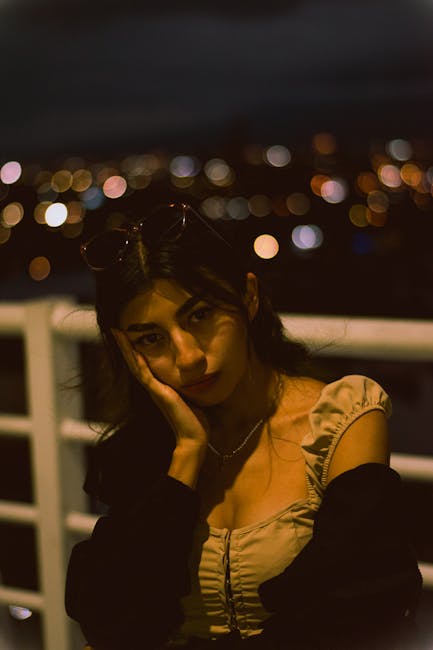
In my experience, the most visible advantage of a larger sensor isn’t always the overall brightness at ISO 3200—it’s how gracefully it tolerates shadow lifting.
At night, it’s common to expose for skin highlights (streetlights, storefronts, car reflections). Later, you bring up the shadows. Larger sensors usually maintain cleaner color and less banding during that process.
Micro Four Thirds can still be excellent, especially with modern in-body stabilization and good lenses, but you have to be more intentional about exposure and noise reduction settings.
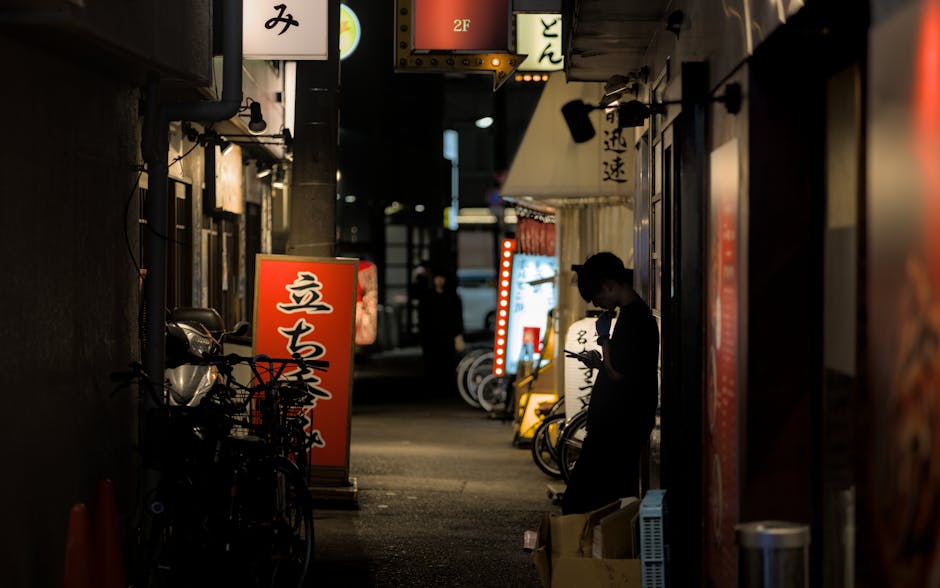
Real-world example: ISO 6400 street scenes
I ran a side-by-side test in late 2025 that mirrors a typical assignment: a nighttime walk with mixed lighting (LED signage + tungsten spill), shooting handheld at shutter speeds fast enough for subject movement.
I set a consistent shutter speed strategy—1/250s for people moving, 1/125s for static scenes—then adjusted aperture/focal length to keep framing similar. The full-frame body produced cleaner shadow texture at ISO 6400, while APS-C and Micro Four Thirds held up well but showed earlier color speckling in deep shadows after lifting.
The takeaway wasn’t that smaller sensors “fail.” It’s that smaller sensors reach their comfortable noise floor sooner when you push shadow recovery.
Depth of field: why sensor size changes bokeh (even with “the same aperture”)
Sensor size changes depth of field when you keep subject framing and output consistent.
Depth of field (DOF) is controlled by aperture, subject distance, focal length, and the circle of confusion used for rendering acceptability. When two cameras produce the same framing, the smaller-sensor camera usually uses a shorter focal length lens for the same field of view, which increases DOF.
This is why photographers often say, “Bokeh is a crop factor story.” It’s not magic—DOF is a geometric effect linked to focal length and sensor size.
Long-tail: Does sensor size affect depth of field at the same focal length?
Yes, but only when you compare equivalent framing. If you literally use the same focal length and same subject distance on different sensor sizes (meaning your framing will differ), DOF won’t match the way most people experience it.
In real use, you usually match framing (same composition), and that forces different focal lengths and equivalent perspectives, which changes DOF.
Equivalent focal length and DOF “look”: how I translate it
I think in terms of field of view equivalence for composition, then in terms of DOF equivalence for separation.
For example, full-frame 85mm at f/1.8 has a distinctive portrait look. On APS-C (1.5× crop), an equivalent field-of-view uses ~56mm. To mimic the DOF separation, you’d compare roughly equivalent apertures (often discussed as f-number equivalence), but the practical move is: choose lenses that deliver the blur you want at the shutter speed you can maintain.
This matters for night portraits because at low light you often need wider apertures anyway to keep shutter speed high enough to avoid motion blur.
Noise: ISO is only half the story—sensor size changes how noise appears
Noise isn’t just “more ISO = more noise.” It’s also how noise interacts with exposure level, in-camera processing, and the sensor’s readout characteristics.
Here’s the part I wish more gear articles explained: When you underexpose and lift, you amplify both signal and noise. That’s why two cameras can look similar at base exposure but diverge dramatically after editing.
Sensor size affects how much headroom you have before clipping highlights and how clean the shadows remain.
Patterned vs. speckle noise: what you’ll notice in files
Smaller sensors can show more visible color speckling in shadow regions at high ISO, especially if the image is underexposed and then brightened. Larger sensors tend to produce smoother luminance noise and better color stability.
That said, modern processing pipelines (denoise algorithms, demosaicing improvements, and temperature-aware sensor noise models) can narrow the gap significantly between generations of cameras.
In 2026, the most practical approach is to test real files from the cameras you’re considering—ideally the exact ISO you’ll shoot, in the lighting you actually face.
Sensor size by format: full-frame vs APS-C vs Micro Four Thirds vs 1-inch
Different sensor sizes push photographers toward different tradeoffs in low light, depth of field, and lens ecosystems.
Below is a comparison that’s useful for decisions, not just specs. Use it as a starting point, then validate with your own shutter speed and framing needs.
| Sensor format | Typical strengths in low light | Depth of field behavior (at equivalent framing) | What I’d watch out for |
|---|---|---|---|
| Full-frame (36×24mm) | Cleaner shadows, better highlight-to-shadow balance, strong high-ISO usability | Shallower DOF and stronger subject separation for portraits | Larger/lighter doesn’t always hold; heavier lenses can reduce your practical portability |
| APS-C (~23.6×15.6mm) | Very strong modern results; often best value for balancing size and performance | More DOF at the same framing; separation relies on faster lenses and/or closer distances | Shadow lifting can show earlier color noise if you underexpose |
| Micro Four Thirds (17.3×13mm) | Great stabilization options; compact lenses help you keep shutter speeds up | Deeper DOF at equivalent framing; bokeh is possible with fast primes but needs intent | For very dark scenes without stabilization, noise can become more obvious in deep shadows |
| 1-inch | Convenience for travel; decent for night street with short shutter + stabilization | Noticeably deeper DOF, less separation | High ISO and shadow recovery can degrade faster—use exposure discipline |
The lens matters more than people expect
Sensor size doesn’t exist in a vacuum. Lens transmission, aberration control, autofocus reliability in low light, and how wide your aperture actually is in real shooting conditions matter as much as the sensor.
For instance, a full-frame body with a slow kit zoom at f/5.6 is still going to struggle at night compared to an APS-C camera paired with a fast 1.8 prime—because the lens aperture changes your photon budget.
If you remember one thing: photons come from aperture and shutter speed, not from the sensor size alone. The sensor decides how cleanly those photons become pixels.
Actionable steps: how to choose the right sensor size for your shooting style
Choosing sensor size should start with your real-world lighting and your tolerance for noise in deliverables.
When I advise photographers (especially for paid work), I use a simple checklist: what’s the typical shutter speed I need, what’s the maximum acceptable noise, and how often do I lift shadows in post?
1) Decide your “minimum usable shutter speed”
Night performance often fails because shutter speed is too slow, not because the sensor is “wrong.” Motion blur is the silent killer.
For people, I default to 1/250s for expressive moments and 1/125s for mostly still subjects (then I rely on good AF and stabilization where appropriate). For landscapes, I’ll go slower, but noise becomes a different problem: long exposure stacking and heat noise management.
2) Match framing first, then compare DOF and noise
When you’re shopping, don’t judge cameras by “bokeh at f/1.8” unless framing is controlled. Compare photos taken at the same composition and similar subject distance.
For reviews, look for samples shot with consistent settings and note whether reviewers used equivalent focal lengths.
3) Use a “shadow lift test” in your editing workflow
If your style involves lifting shadows—weddings, street at night, concerts—do a repeatable test.
- Expose at your normal highlight-protection strategy.
- Import into your editor (Lightroom Classic, Capture One, or the RAW software you actually use).
- Lift shadows by the same number of stops across cameras.
- Check for color speckling, banding, and edge smearing in dark areas.
This is where sensor size tends to show more clearly than at first glance.
4) Don’t ignore stabilization and lens ecosystem
Micro Four Thirds often shines for handheld night work because it encourages smaller lenses and paired stabilization approaches. In practice, stabilization can help you maintain shutter speed without going all the way to higher ISO.
For Canon, Sony, Nikon, OM System, and Panasonic users, the “ecosystem math” includes lens availability, autofocus modes, and how comfortable you are carrying the system for hours.
I’ve seen people buy bigger-sensor cameras and then stop carrying them—then their real-world output becomes worse than the smaller-sensor kit they used consistently.
What most people get wrong about sensor size at night
Most mistakes aren’t technical—they’re assumptions.
- Comparing ISO numbers without matching exposure: ISO is not a universal brightness level across sensors once you account for processing and exposure strategy.
- Ignoring lens aperture: A faster lens can outperform a bigger sensor paired with a slower zoom because photons are the starting point.
- Judging noise from resized previews: Many online images are compressed or resized, hiding artifacts. Inspect 100% crops or download RAW samples when possible.
- Underexposing “because it looks fine”: Night scenes trick your meter. Protect highlights, but don’t bury the shadows if you plan to recover them.
My rule of thumb: if you wouldn’t print the shadow region clean at 20× magnification, don’t rely on “AI denoise” as your default fix.
People also ask: common questions about sensor size, noise, and depth of field
Does bigger sensor always mean better low-light photos?
Bigger sensor usually means more usable shadow quality and cleaner high-ISO performance, but it’s not automatic. The lens aperture, shutter speed, and how you expose the scene are often bigger determinants of whether the final file looks “good.”
If your workflow uses controlled lighting or you routinely keep exposure consistent, the gap can shrink. If you frequently lift shadows or shoot fast-moving subjects in darkness, the larger sensor’s advantage becomes more obvious.
Why do full-frame cameras look like they have more bokeh?
Because when you match framing, full-frame uses longer focal lengths and tends to produce shallower depth of field at the same composition. That geometric relationship drives the “more blur” look people associate with full-frame.
That said, Micro Four Thirds and APS-C can still create creamy blur with fast primes, careful subject distance, and wide apertures. You just have to work the scene differently.
Is ISO less important than sensor size?
ISO is still important—especially for shutter speed control and exposure decisions. But sensor size influences how noise behaves at the ISO you end up using, particularly in shadows after editing.
If you want a practical answer: treat ISO as the knob that sets exposure and shutter speed, then treat sensor size as the factor that sets how forgiving your shadows will be.
How can I test sensor size effects before buying?
Do a shadow recovery test and a framing-matched bokeh test. Find RAW samples if possible, shoot your own test if you have access to loaners, and evaluate at 100% crops.
When I test cameras now (in 2026), I look at three things: shadow color stability, edge detail under denoise, and highlight roll-off. Noise is one dimension; how the file holds up after your edits is the real one.
Practical camera settings for low light by sensor size
Settings depend on the subject, but the principles are universal: protect highlights, keep shutter speed high enough, and minimize unnecessary underexposure.
Handheld night portraits
- Start with aperture priority or manual: choose the widest practical aperture on your lens (f/1.8–f/2.8 depending on sharpness).
- Set shutter speed based on movement: 1/250s for motion, 1/125s for near-still.
- Use autofocus tuned for the environment: face/eye AF in low light; disable modes that hunt.
- Expose for skin: avoid blowing highlights from street lamps and signage.
Full-frame users often can maintain cleaner shadows at higher ISO, while APS-C and Micro Four Thirds users benefit a lot from fast primes and good stabilization.
Concerts and indoor events (the “messy reality” case)
Concert lighting changes every second. Sensor size helps, but your exposure discipline and autofocus reliability matter as much as noise performance.
I recommend shooting RAW, using a conservative exposure target (don’t slam the highlights), and planning a consistent denoise workflow. If your editor is consistent, differences in sensor size become easier to interpret.
Night landscapes and long exposures
For long exposures, sensor size affects thermal noise and how the sensor handles long readout. In this case, shooting technique and post tools like stacking (and possibly dark frame subtraction) become primary.
Long-exposure noise isn’t the same as handheld ISO noise. Comparing sensors only on handheld ISO can mislead you if your style is astrophotography or nightscapes.
Security sidebar for photographers: protect your image files when you test gear
When you shoot comparative tests for gear decisions, you’re creating a mini archive of RAW files and previews. That’s valuable data—so it’s worth protecting it like you would any client shoot.
If you travel with card readers, cloud sync, and laptop edits, consider reviewing practical guidance from our category: Cybersecurity for Photographers. It covers common risks like compromised Wi‑Fi hotspots and unsafe file sharing workflows.
For additional gear-specific workflow habits, you can also align your backup approach with the practices discussed in our Gear Reviews coverage, especially when you’re evaluating storage and transfer tools.
Bottom line: what to do with this knowledge in 2026
Sensor size impacts low-light performance, depth of field, and noise—but only in combination with framing, lens choice, and exposure strategy.
If your goal is cleaner night images with fewer shadow artifacts, prioritize sensor size along with a lens that gives you the shutter speed you need. If your goal is subject separation, prioritize equivalent framing and focal length behavior, not just maximum aperture numbers.
Your actionable next step: run one repeatable test in your real workflow—shoot the same scene at matched framing, then compare shadow recovery at a specific ISO range. That will tell you more than any spec sheet, and it’ll keep you from buying a camera that looks great on paper but doesn’t match your output requirements.
Want a sharper buying decision? Pair this sensor-size understanding with our related training on field technique and file workflow in Tutorials & Tech, then choose the system you’ll actually carry and use when the light drops.
Featured image alt text suggestion: Deep Dive: sensor size impacting low-light performance, depth of field, and noise in a nighttime street portrait